
Friday, August 16, 2013

Kitchen Nightmare: Homemade Red Curry Paste

I know you all find this hard to believe, but I occasionally screw things up in the kitchen. And I'm not afraid to blog about it. Usually there is a very good reason for my failure. Perhaps because I was missing a few ingredients that were much more critical to the success of the dish than I realized. Or more than likely, I was attempting to bake, where you can't just guesstimate measurements.

In the case of the red curry...I wish I knew what happened. I obtained this red curry paste recipe during my cooking class in Thailand. Sure, the translation may be a bit off. My personal favorite instruction in the notes section: "Put less small chili and add more big chili in case of eating chili problem."

Let's just put it this way. What I made following this recipe was a BIG chili problem.

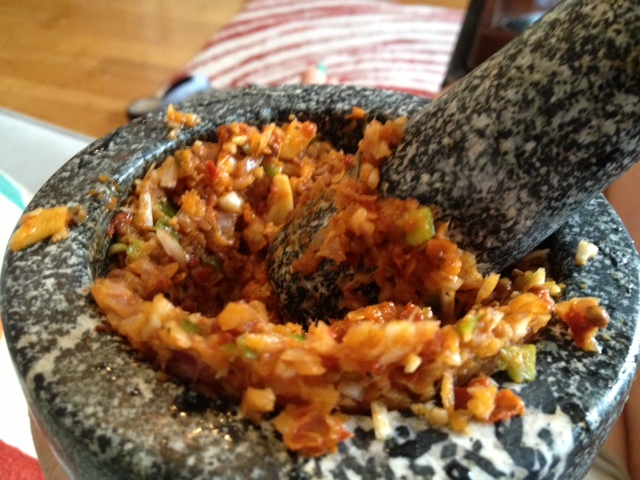
What you see on the right here is what was my finished product after following this recipe. I even ventured out to H-Mart in Virginia to get some of these awesome ingredients (though I still had the small dried red chilis that I brought back with me from Thailand...even 10 months later those babies are POTENT).


It should not look like this at all, and I know this because I've bought red curry paste before when making various Thai dishes. Before I got ambitious. But what it all boils down to is that I learned that sometimes, it is just easier and less painful (don't handle chilis and touch anywhere on your face. Ever.)

So perhaps you're feeling ambitious and want to try this out. If you do, and you get it to come out the right consistency, please let me know how you did it!

Ingredients:

Dried Spices
  • 1 tsp coriander seeds, roasted until fragrant
  • 2 cardamom pods, roasted until fragrant
  • 1/2 tsp black peppercorns
  • pinch of salt
  • 3-5 dry big red chilies (seeds removed and soaked in water for at least 10 minutes)
  • 1-8 small dried chilies for extra spicy
Fresh
  • 1 tsp galangal, skin removed, chopped
  • 1 TB lemongrass, chopped
  • 1 piece kaffir lime peel, chopped
  • 1 tsp coriander root, chopped
  • 2 cloves of garlic, chopped
  • 2 shallots, peeled and chopped
  • 1/2 tsp shrimp paste.
Please note: Can use coriander stem, instead of root. Can use fresh ginger root, instead of galangal or Thai ginger.

Directions:

Put the small chilies, coriander seeds, cardamom pods, black peppercorns into a stone mortar and pound them into a powder. You can use a food processer instead, per the instructions.

I never got a powder. that was problem #1.

Then add the rest of the ingredients and pound for 15 minutes until paste is smooth.

You've seen the photos. There ain't nothin' smooth about it.

Anyone up to the challenge?

Monday, August 12, 2013

Spinach Artichoke Orzo

I like orzo pasta. It's quick, quite versatile, and is a great addition to a variety of vegetable dishes. Last week, my friend Nick at www.macheesmo.com posted check another orzo recipe I just HAD to try. I altered the ingredients slightly to accommodate what I had on hand, but it turned out alright despite not following his recipe to the letter. However, I still prefer some other orzo dishes I've made in the past. In fact, last week I made my favorite orzo side dish which you can find the recipe for here: http://sack-smallgirlbigappetite.blogspot.com/2012/09/orzo-chickpea-salad.html

But here's the recipe for Spinach Artichoke Orzo. If you're feeling ambitious, make them both and see what you prefer. They are both great for "pack your lunch" workdays.

Spinach Artichoke Orzo (serves 4-5)


Ingredients:

  • 10 oz orzo pasta, cooked and rinsed 
  • 1/2 red onion, diced 
  • 1 bag of spinach, washed well 
  • 6 oz marinated artichokes, drained 
  • 1/2 cup sun-dried tomatoes (in oil), diced 
  • 2 cloves garlic, minced 
  • 2 TB olive oil 
  • 3/4 cup shredded Asiago cheese 
  • Salt and pepper 

Directions:

Chop onion, sun-dried tomatoes, and artichokes.

In a large skillet, add a drizzle of olive oil and the diced red onion over medium-high heat. Cook for a 3-4 minutes or until onion softens. Season with a pinch of salt.Add artichokes, sun-dried tomatoes, and garlic and continue to cook for another minute or two.

Meanwhile, cook the orzo according to package instructions, approximately 9 minutes. Once cooked, drain and rinse with cold water.

Add washed spinach to the skillet. Cook until spinach is wilted, just a minute or two.

Stir in orzo and season with salt and pepper. Stir well to combine.

Serve salad warm or cold with cheese.

Friday, August 9, 2013

Food Porn: Montreal

Two weeks ago I traveled to Canada for my yearly international trip. The pact I made with myself a few years ago to take one international trip year has taken me to some amazing places, most recently Thailand. Food always plays a big role in my travels and I'm not afraid to admit that I look to what the food will be like (as well as the other sights and attractions of a country...but let's be real, food is a driving force).

This year, I opted to take a short trip to our neighbor to the north: Canada. My visit to the United States' hat was filled with food and I was provided a checklist of sorts for things I needed to eat while I was there. From smoked meat sandwiches to poutine to raw cheese...I hit them all.

Much like the city of Montreal itself, which is a bachelor party dream from the peep shows to sex shops to late bar hours, the food in the city is incredible sexy. It's French. It's rich. It's meaty. Food-gasms abound. Enjoy the recap.
While in Montreal, I had the pleasure of going to two foodie staple restaurants: The Liverpool House and Au Pied de Cochon. The former is a sister restaurant to Joe Beef, one of the most celebrated restaurants in the city. They're known for their meat dishes (including a foie gras double down...no joke). But I elected to go to their more fish heavy restaurant. This is where I probably ate my favorite dish of the trip. This scallop and pork belly dish (pictured on the right) was cooked to perfection and I loved the combination of flavors.

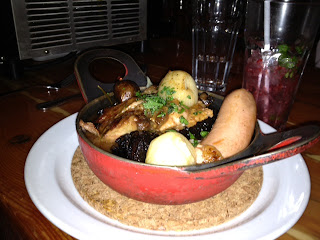
The visit to Au Pied de Cochon was a bit more on the rich side. While there, my dining companion and I indulged on meat products, namely something referred to as the "melting pot." Essentially, this was every type of sausage and pork cut you can imagine, placed in a bowl over mashed potatoes. Good God. The blood sausage put it over the top. Get a load of that bowl of sausage. Hot, isn't it?

I also had yet to have poutine during the trip, so here is where I tried my first Canadian poutine. And it was covered in foie gras. I had to be rolled out of this place. But a girl's gotta eat.  But we elected not to get the Pig's Head for two. You have to draw the line somewhere...

I'm not usually much of a rich food eater, but there are two areas that I do like to regularly indulge in: cheese and craft beer. I got to do both while in Montreal, enjoying a hibiscus beer (wonderful on a hot day) and visiting Atwater Market, home to what I'm told is the best fromagerie in Montreal.

I can't even begin to describe how amazing the cheese was, in particular the non-pasteurized variety. Raw cheese is wonderful, and I stocked up on the good stuff before spending a day at the botanical gardens. I also had a great black rind cheddar cheese that was salty and velvety. This particular cheese came at the recommendation of the foodie tour host, who I talked to at great length the previous day of where to go and what to eat in the city.
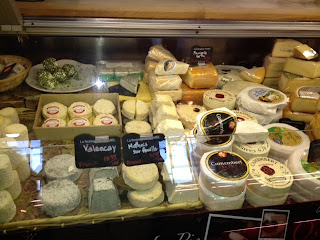
Something highly amusing happened while I was at the fromagerie. Amidst all these amazing cheeses, raw and non-raw, every type of specialty cheese you can imagine, the cheesemonger was faced with a very tough question by one of the counter visitors.

The question was not of the technical variety, like "how is cheese made?" or of the sympathetic to goats variety like "were the goats in a happy environment when their milk was taken for use in this cheese?" (though I would love to hear the answer to that one!)

No, the question was this: "Excuse me, do you have Kraft cheese?"

The below photo was taken at the botanical garden and pretty much sums up my reaction to this question.

 
'Merica.


Sunday, August 4, 2013

Homemade Marinara and Meatballs

There are plenty of jarred sauces out there. However, I think when you have a little time to kill, it's worth it to make a homemade sauce.

I have made this sauce a few times, and every time it turn out a bit differently. It makes for a small army, so I suggest having company over for this. It also freezes amazingly well. I will be breaking out some of the frozen sauce in the coming weeks as I continue to pack my lunch daily.

I've posted this on here before, but I'm reposting because I've made some adjustments to how I make it, improving it a bit, in my book at least.


Ingredients:
  • Olive oil
  • 5 cloves of garlic, chopped
  • 1/2 cup breadcrumbs
  • 1 small onion, chopped
  • fresh chopped parsley (guesstimate, I have no idea how much I ended up using)
  • 2 bay leaves
  • 1 TB oregano
  • 1 tsp onion powder
  • 1 tsp garlic powder
  • Fresh basil (approximately 1/4 cup)
  • 3 (28 oz) cans of crushed tomatoes (plum, preferably) in sauce
  • 1 (15 oz) can of tomato sauce
  • 2 carrots (cut up)
  • 1 TB salt
  • 1/2 tsp sugar
  • 1 1/2 pounds ground beef
  • 3 sweet Italian sausage links
  • 2 eggs
  • 1 tsp baking soda
Directions:

Put olive oil in large cooking pot, put enough in to cover the bottom of the pan. Put the chopped garlic and chopped onions in and simmer until light brown color.

Add the 3 cans of tomatoes in sauce. Also add tomato sauce and mix. Add the cut up carrots, which help cut the acidity in the sauce.

Next add the salt and chopped parsley. Add basil leaves and oregano to the sauce. Add bay leaves and 1/2 tsp sugar in the gravy. Simmer for 1 1/2-2 hours.

Meanwhile, in a large bowl combine the ground beef, eggs, parsley, bread crumbs, 1/2 tsp salt and a little pepper. Sprinkle in the garlic and onion powders. Mix up and make into meatballs. Put the meatballs into a frying pan coated in olive oil and brown each side. This should take approximately 5 minutes. Then add meatballs to the sauce.

Add sausage to the sauce. It should naturally crumble during the course of cooking. The meat can probably sit in the sauce for up to 1 1/2 hours as it simmers.

Enjoy over your favorite pasta. I like to serve with fresh shredded parmesan.

Tuesday, July 30, 2013

Hello 30...


I know what you're thinking. It's not my birthday. I'm not 30. When I first greeted 30, I doubt it was such a happy occasion. In fact, I remember it more being a big "F-you 30! This decade is going to rock!" And for the most part it has. But this has very little to do with the age of 30, but more about the number 30. But let me step back for a second...

It's pretty common knowledge that your metabolism can change over time, and even more so once you get out of your carefree 20s. It's harder to maintain a healthy lifestyle, you get busier, have less time to devote to eating well and exercising, and gravity starts to take its toll. I have been doing my best in the last year or so to reverse that trend. I'm in better shape than I've ever been, eating a much more balanced diet, and am generally in a better place than where I was when I entered this decade.

But even the strongest willed can find their Achilles heel. In the last 2-3 months I've found mine in many forms. Beer, for one. An injured foot preventing me from exercising. A healthy appetite even more magnified due to stress.

Today is 30. July 30. And I'm presenting myself with a 30-day challenge to get back to doing what I love: Regularly exercising (who'd have thought I would say I love that!), Vodka drinks (my low carb alcoholic best friend), and most importantly cooking more.

So until August 30th, I am making a pact to:

1) Stop drinking beer for 30 days. Which sucks, but it's feasible when I allow myself vodka. And wine.
2) Provide a home prepared/cooked meal and snacks for myself for lunch every day. This means no hitting the vending machine or cafeteria at work. This will not only have me eating healthier, it will also save me money.
3) Slowly but surely getting back into running. The doctor gave me the all clear, so I'm ready to ease back in.

I place this on my blog as a bit of an oath to myself to hold myself accountable. It's only 30 days, and perhaps it will extend longer and I'll adapt some of these habits again long-term. But for now, it's baby steps to combat a summer of fun and excess.

Speaking of excess, I'll post about all the food I ate on vacation in Montreal later this week. This gives good reason for why I'm enjoying my salads this week.

Sunday, July 28, 2013

Spinach and Egg Breakfast Sandwiches

A few weeks ago, I decided to try out a simple egg sandwich recipe that my friend Nick had posted last year on his blog, www.macheesmo.com. In his instructions, he indicated several ways to freeze/store these sandwiches for a later date. I followed the instructions he provided on freezing the sandwiches whole and how to defrost when you need a sandwich.  I tested out this strategy over the weekend, following his instructions for reheating and they defrosted perfectly. 

Spinach and Egg Breakfast Sandwiches (makes 12 sandwiches)


Ingredients:

  • 12 eggs, scrambled
  • 2 cups baby spinach
  • 2 TB butter
  • 6-8 ounces cheese, shredded. I used white cheddar. 
  • 12 whole wheat English muffins 
 
Directions:

Scramble eggs and grease each muffin tin with a bit of butter. Add baby spinach to each tin. Just a few leaves per tin will do the trick.

Evenly divide eggs between 12 muffin tins.

Bake eggs at 350 degrees for 20-22 minutes until they are cooked through.

Pop the eggs out of the tins.

To make a sandwich, toast the English muffin, add the cheese and egg. Mash the egg down a bit so it evenly covers the muffin.

Bake for a few minutes to melt the cheese.

To store these, make the sandwich and then wrap tightly in foil, and place in a plastic bag in your freezer. When you are ready to eat, place the frozen wrapped package in a 350 degree oven for 30-35 minutes and it'll defrost perfectly. This equates to the time I need to get ready in the morning, so this may just be one of my new go-to breakfast sandwiches when I tire of my daily morning Cheerios regimen. :)

Thursday, July 18, 2013

Food Porn: Estadio.....and I'm heading to Montreal!

Sorry to break it to you, Jose (Andres). I now have a new favorite tapas place in town...Estadio! I've tried to get reservations many times before, but this time I planned ahead for my parents' visit earlier in July. It was well worth the wait and I have a feeling I'll just make reservations in advance a few times a year just to revisit this place.

We ordered a variety of tapas, but some of the highlights included this halibut dish, with a chili sauce, overtop of chick peas, dried cherries and some type of green. Great flavors, just melted in your mouth. I also really enjoyed their roasted corn with spices, herbs and manchego cheese. I tried to re-create this at home earlier this week, but while the result was good, it  wasn't nearly as good as thing. Highly recommend ordering this if you ever find yourself so lucky to get in the door.

Since it was my mom's birthday, we ordered a dessert to share. This manchego cheesecake, with pistachio crusted quince base was the bomb. Seriously.

Speaking of the bomb...I'm going to the gastronomic bomb called Montreal for a few days, followed by a few days in Toronto. I'll be sure to report back with a ridiculous number of food photos and insights to what I'm sure is going to be a great trip!